If you read my last post then you already know how to get an Azure DevTest Lab setup using your Azure subscription. Next, I’ll introduce you to some concepts and get you started creating your very first virtual machines and really kick the lab’s tires.
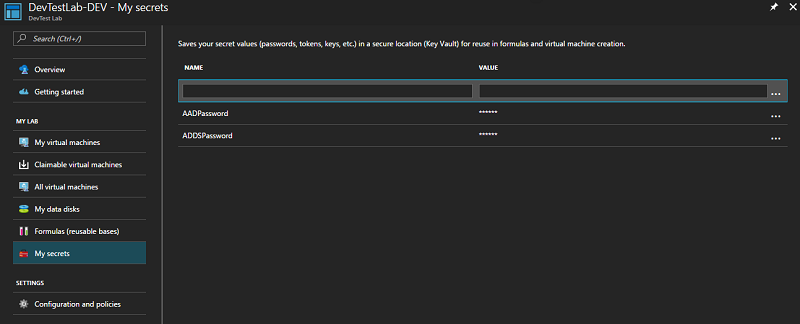
Now, before you get all excited and jump straight to that shiny Add button to create a VM, there’s something I recommend you do first: save your secrets. When your DevTest Labs instance is created in Azure, it creates a few other things like virtual networks, storage containers, and other interesting things (more on that later). And among those things is an Azure KeyVault dedicated to saving secrets (passwords) for the DevTest environment. Help yourself avoid future headaches from troubleshooting incorrectly entered passwords and go save some passwords there before you start cranking out VMs. For example, I start out by saving an AD DS password that I use for logging into my “on-premises”, domain-based Azure VMs and an AAD password used for my Azure subscription’s global admin account for when I’m feeling cloudy. As you get deeper into DevTest Labs you’ll be able to find all kinds of ways to leverage this functionality. Please do so here:
OK, that’s out of the way. Now we can get busy clicking the fun buttons.
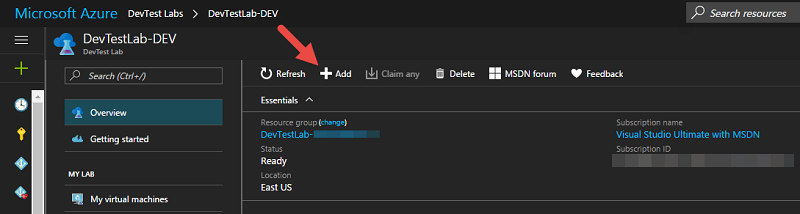
When you first start up your DevTest lab in Azure and take a look at the Overview blade you won’t see any virtual machines present. They’re easy enough to create though, at the top of the screen just click +Add:
Your VM will likely need an operating system, and lucky for us, these are made available via the Azure subscription. Most times I pick a Server OS when starting from scratch, but you might prefer Linux or a flavor of Windows Client OS. It really depends on what your Azure subscription entitles you to create and is out of the hands of DevTest Labs.
Tip: to create VMs running the client OS’s you’ll need an Azure subscription that include MSDN or Enterprise Dev/Test for EA.
OK, time for a quick overview and vocabulary lesson on creating a VM using the following graphic (you’ll get to this view by selecting an OS, and then clicking on Artifacts under More options in the middle blade):
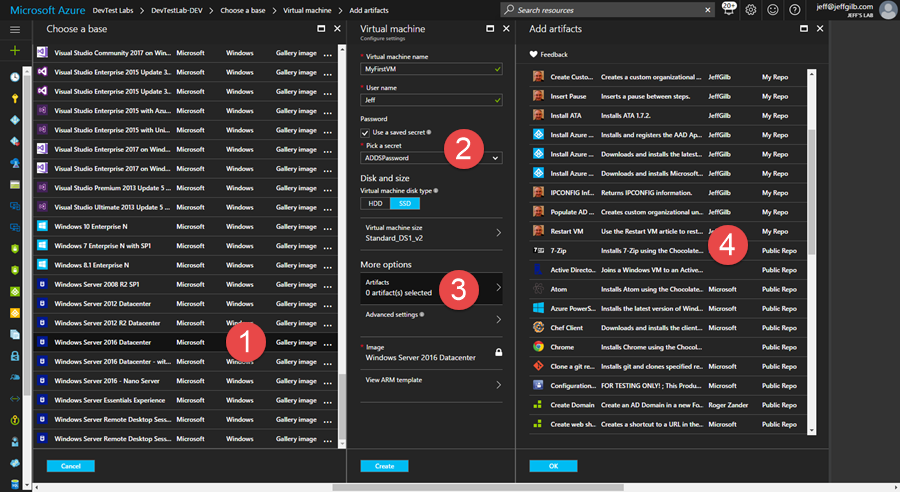
- Choose a base. This is where you pick an operating system. Self-explanatory.
- Use a saved secret. The first pieces of information in this blade that you need to provide for the VM are hopefully obvious to you: the name for the VM and the user name that will be used to access it. You can manually type in a password for that user, but what is this “Use a saved secret”checkbox stuff all about? C’mon, you know, we already talked about this. Select the option to use a saved secret and then select the secret (password) that you want to use. Now you won’t have to risk entering the password incorrectly every time you create a VM—and you can use those secrets in other interesting ways with artifacts later on too.
- Artifacts. You’re going to love these. Artifacts are basically configuration commands/scripts that you can use to customize your VM and do…well, just about anything. I’m not going to go through each of these public artifacts, check them out and select the ones you think are interesting. Don’t worry about trying to get it 100% right the first time, you can always apply artifacts to running VMs later. Also, the list of artifacts is constantly growing as people add them to the DevTest Labs GitHub repo (more on that later) and you can also use your own personal artifacts that you create—which leads us to #4.
- Artifact Repo. Notice in the picture above that some of the available artifacts are from “My Repo” and others are from “Public Repo”. That’s because I’ve added my very own personal GitHub repo to this DevTest Labs instance so that I can use custom artifacts. For now, we’ll just focus on using the default public repo artifacts and I’ll show you how add your own GitHub repo and make custom artifacts in subsequent blog posts.
Tip: there are also some advanced options available that are out of scope for this blog post unless you have nothing else to do today, but check them out when you get comfortable with the basics. These allow you to do things like create more than one VM at a time and other cool stuff.
OK, everything sorted, just click Create and DevTest Labs will take care of the VM creation and customization heavy lifting for you. You’ll see the VM name appear in the Overview blade under My virtual machines in a Creating status. In just a few minutes (these usually install very quickly) the status will change to Running and you’re in business. Click on the VM name and you’ll be able to see a few interesting things:
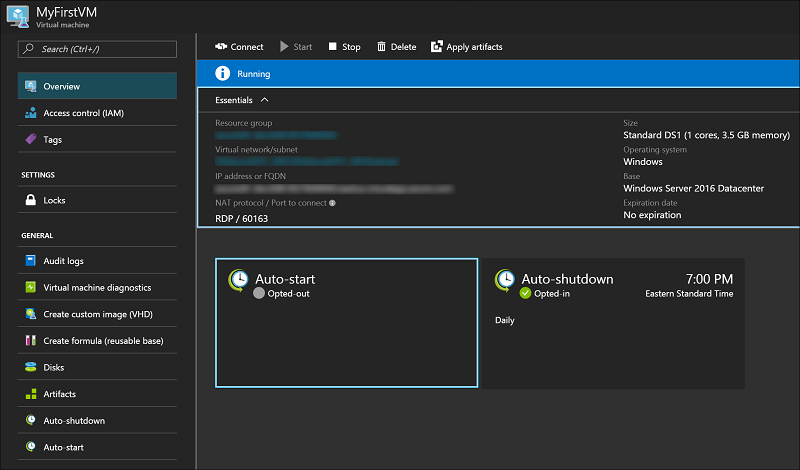
On the VM overview blade you can review basic information about your new VM and also see if it is configured to auto-start or auto-shutdown. By default, your VM will be opted in to auto-shutdown, but you’ll have to manually configure auto-start if you want to use that. Pretty handy eh? Speaking as someone who has left VMs running on accident (including while writing this blog post!) the auto-shutdown is one of my favorite features and has saved me from losing more than a little of my monthly Azure allowance!
Tip: Using Azure VMs without DevTest Labs? That’s OK, you can auto-shutdown those now too.
At the top of the pane you can see the options available for interacting with the VM. The Connect option triggers an RDP connection for you to log into your VM using the credentials that you supplied when you created it, the Start, Stop, and Delete buttons allow you to do those things to the VM, and Apply artifacts is where you go to further customize your running VM. That’s covered in the next blog post.
So, at this point in the blog series, you should have a fairly basic understanding of Azure DevTest Labs and how to create a pretty standard Azure virtual machine with it. I’d be remiss if I didn’t point you to the official Azure DevTest Labs documentation up on docs.microsoft.com for more information. And, if you get stuck and can’t find an answer in the docs, or just looking for others to talk to about DevTest Labs, you can also visit the Azure DevTest forum by clicking the MSDN forum link in the console itself.

Next up, connecting your personal GitHub repository to your DevTest Labs setup.
You’ve seen my blog; want to follow me on Twitter too? @JeffGilb.
![]()