Why would you do this?
You’ll need to set up NDES to assign and manage SCEP certificates to support certificate-based authentication. That’s handy for things like securing VPN connections or certain types of WiFi profiles or maybe you want to secure email with SMIME encryption. Using certificate-based authentication means your users won’t need to enter their user name and password to get authenticated to on-premises resources. You probably already know this or wouldn’t have come across this blog post. For now, I’ll just assume you know why you need certs. Good enough for me.
This post is about NDES and SCEP. This is not about PKCS.
Disclaimer: this is basically my own cheat sheet for implementing NDES for SCEP. It’s a record of my own chain of consciousness. Use at your own risk. I do not provide technical support (unless you have a Microsoft Premier Support contract and I’m on the job!).
What do you have to do?
This post should help you get the basic NDES infrastructure up and running to successfully deploy SCEP certificates for Intune managed devices. What you do with that infrastructure is up to you. There’s some links at the end if you need some ideas.
Here’s the basic flow for the remainder of this post:
- Prerequisites to have set up before you can get NDES’y
- Fun with Certificate Authority
- Install and configure NDES
- Install and configure the Intune certificate connector
- Do Intune stuff
Prerequisites
You can read about these in the official docs, but here’s my quick breakdown. Having an Intune subscription and devices to test with later goes without saying…but I just said it so I guess not.
- Active Directory Domain. All the servers you use for setting up NDES need to be joined to the same Active Directory domain.
- Enterprise Certificate Authority. Not a standalone CA. Enterprise edition of Windows Server 2008 R2 or later. I used Windows Server 2016 Enterprise for this post.
- A member server. To install NDES and the connectors on. This cannot be installed on the Certificate Authority server. This instance of NDES cannot be shared with any other MDM. They will fight. Intune will win. Windows Server 2012 R2 or later. I used Windows Server 2016 Enterprise for this post.
- Azure Application Proxy. Can be installed on the same domain member server you will install NDES on. Technically, you don’t need this if you’d rather just allow 443 traffic from the internet into your corp network. So yeah, get this set up before you start messing with NDES.
- Service accounts. You’ll need two, one on-premises and one in the cloud:
- Cloud-based: Azure AD user account with Intune administrator permissions and assigned a valid Intune license.
- On-premises: domain user account.
Fun with Certificate Authority
Sign into the Certificate Authority server with administrator privileges to complete the steps in this section.
Export the trusted root cert
Log on to the enterprise CA and run the following command to export the trusted root certificate. You’ll need to run this command from an administrative command prompt, not PowerShell:
certutil -ca.cert <path and file name ending in .cer>
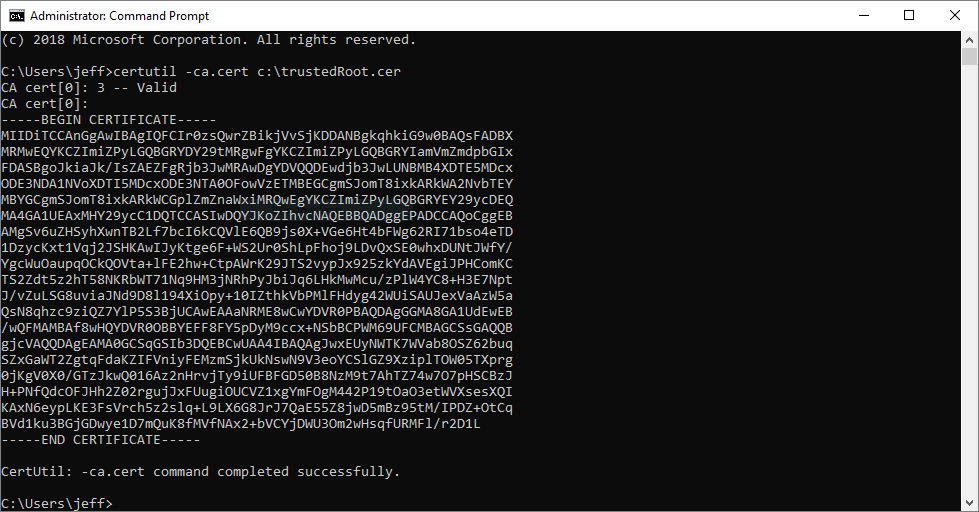
You’ll need this when all is said and done to create the trusted root certificate configuration profile in Intune so don’t lose it.
Create the certificate template for NDES
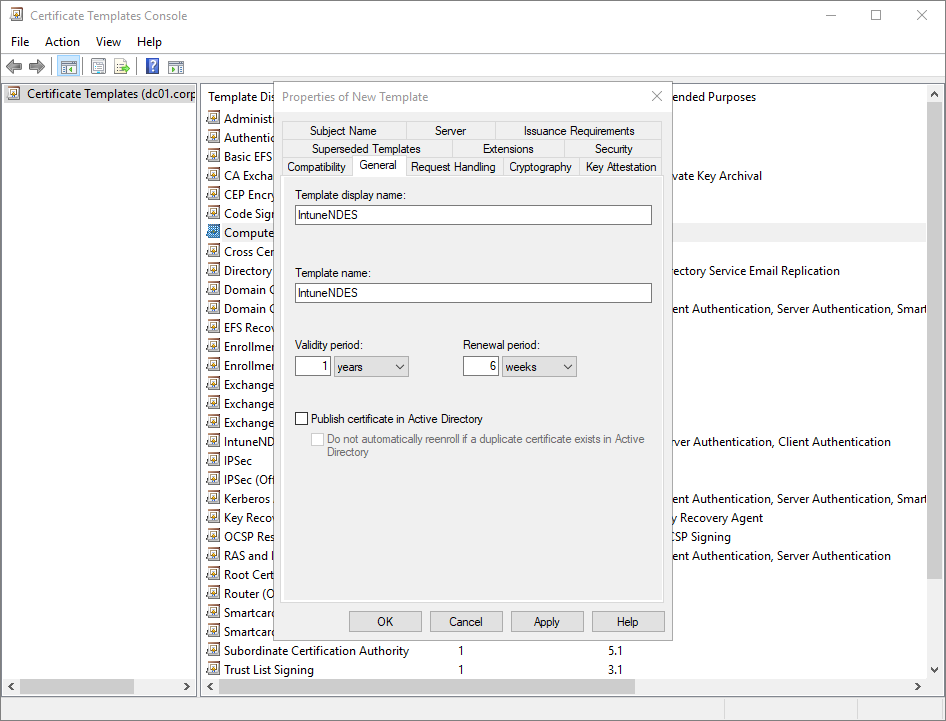
NDES needs a certificate template to use when requesting a certificate from the CA on behalf of your Intune managed devices. The easiest way to make one is to duplicate an existing certificate template. To do this, open the Certification Authority console (certsrv.msc) on the CA. Right-click Certificate Templates and select Manage. Once you’re in the Certificate Templates Console, right-click the Computer (or User) certificate template and select Duplicate Template.
Give it a cool name like IntuneNDES on the General tab and ensure Publish certificate in Active Directory is not selected.
After that, ensure the new certificate is configured thusly, leaving everything else to their default values:
- Request Handling tab. Ensure Allow private key to be exported is unchecked. It should be unchecked by default. Also note that the purpose is set to both signature and encryption. You’ll see that again later.
- Extensions tab. Select Application Policies and ensure client authentication and server authentication are displayed in the description area. Next, select Key Usage and click Edit. Ensure Signature is proof of origin is not checked. It should be unselected by default. If that’s checked, you’ll have issues with Apple devices later.
- Security tab. Ensure the NDES service account has read, write, and enroll permissions for the certificate template.
- Subject Name tab. Select Supply in the request. Click OK on the scary warning.
Save the template and then close out of certificate manager back to the main Certification Authority console. Make note of the certificate template name, you’ll need that later.
Publish the new certificate template
Back in the Certificate Authority console, right-click Certificate Templates > New > Certificate Template to Issue and select the cert you just made
> OK.
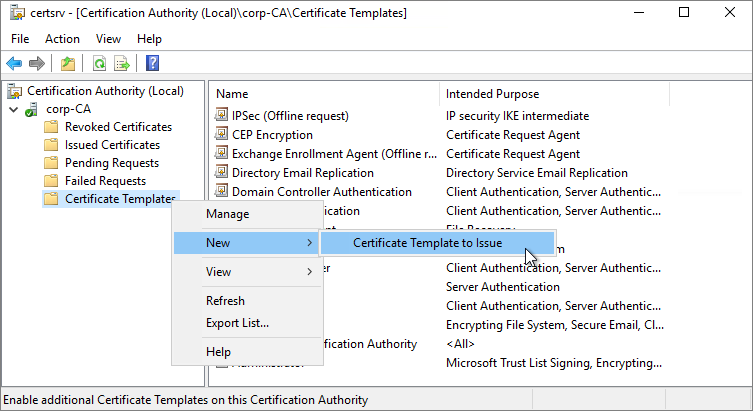
Verify that your new template is published (now listed in the console), and you’re done. Close out of the Certificate Authority console.
Since you’re already logged on to the CA anyway, you might as well run these next commands from an administrative command prompt. These changes allow using Intune to set the validity period for your certificates to be longer than the defaults. It’s not necessary for this example, but imagine if someone wants to change the validity period using Intune later and you forgot how to do this or can’t get access to the CA again. Better safe than sorry.
certutil -setreg Policy\EditFlags +EDITF_ATTRIBUTEENDDATE
net stop certsvc
net start certsvc
Install and configure NDES
Sign into the member server with enterprise admin privileges to complete the steps in this section.
The domain member server you will install NDES on is probably the same server you previously installed Azure Application proxy on and that’s OK. You’ll need to log into the server with an account in the Enterprise Admins group. That’s required to add the NDES role to the server.
Install NDES
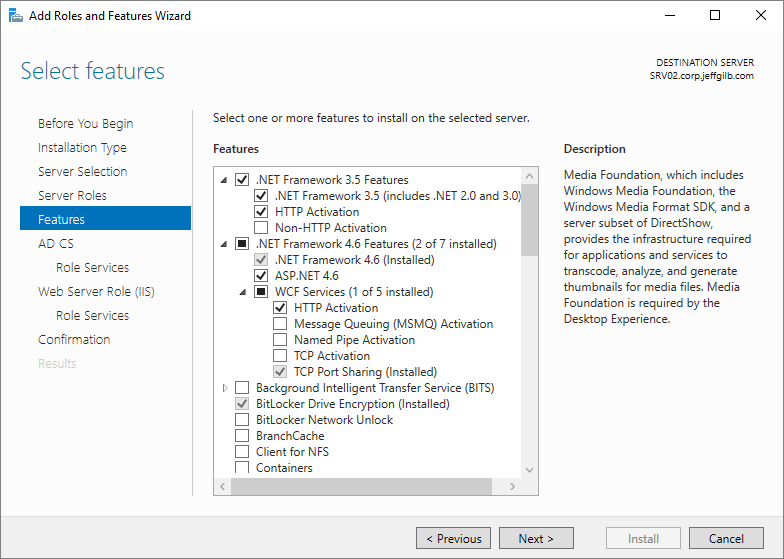
Open up Server Manager on the soon-to-be NDES server. Click Manage and then select Add Roles and Features to start the Add Roles and Features Wizard.
Tip: At any point during the rest of this section you should select to add additional features for the role or feature if you’re prompted to.
On the Server roles page, select Active Directory Certificate Services (NDES is a part of AD CS) and
click Next to select features. Select these features/sub-features to
install:
- .NET Framework 3.5 Features
- .NET Framework 3.5 (includes .NET 2.0 and 3.0)
- HTTP Activation
- .NET Framework 4.6 Features
- .NET Framework 4.6
- ASP.NET 4.6
- WCF Services
- HTTP Activation
- TCP Port Sharing
Click Next to start configuring AD CS.
Uncheck Certification Authority and instead select only Network Device Enrollment Service.
Accept the additional features prompt and click Next to start
configuring the web server role.
Scroll down the list to the Management Tools section. Select to add
these IIS role services:
- Management Tools
- IIS 6 Management Compatibility
- IIS 6 Metabase Compatibility
- IIS 6 WMI Compatibility
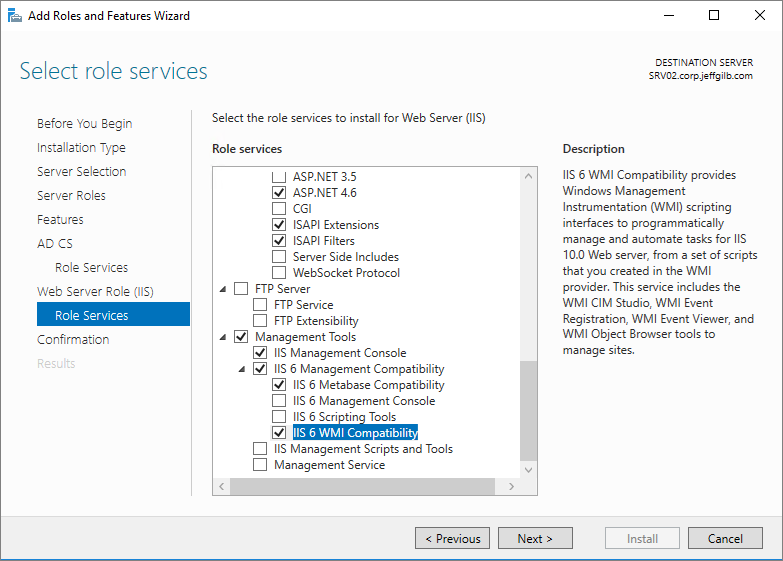
Click through and kick off the installation.
When the role and features installation completes, click the little yellow triangle alert in the top right corner of the Server Manager UI to Configure Active Directory Certificate Services:
- Ensure you’ve entered an account in the Enterprise Admins group on the Credentials page of the AD CS Configuration wizard and click Next.
- Select Network Device Enrollment Service on the Role Services page.
- On the Service Account for NDES page, select the NDES Service on-premises service account you created.
- Select the Enterprise Certificate Authority that NDES will work with on the CA for NDES page.
- Just accept the defaults on the RA Information page.
- Just accept the defaults on the Cryptography for NDES page (2048 key lengths).
- Review the settings on the Configuration page and click Configure.
- Click Close on the Results page when you get the Configuration succeeded message.
NDES service account configurations
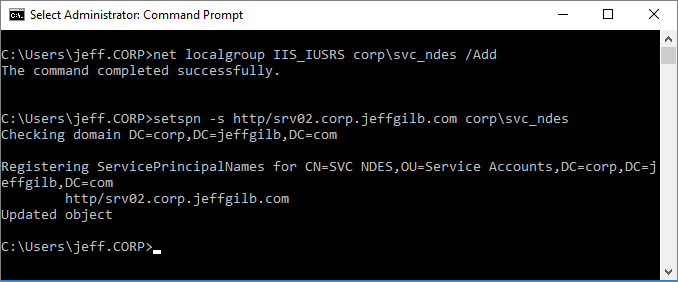
Open computer management (compmgmt.msc) and add the on-premises NDES service account you made during the prereq phase to the NDES server’s IIS_IUSRS group that is created when IIS is installed.
Or you could just open and administrative command prompt and do it from there. While you’re messing with this account, now is also a good time to set the SPN for it in AD too:
net localgroup IIS_IUSRS <domain>\<username> /Add

setspn -s http/<serverfqdn> <domain>\<service account>
NDES server registry edits
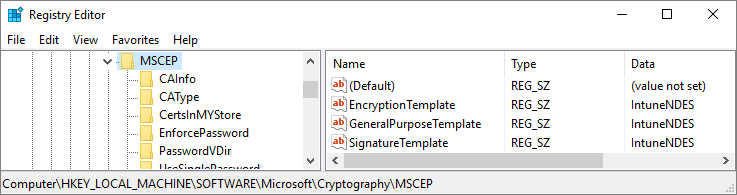
Now we need to let NDES know what certificate template to use when it reaches out to the Certificate Authority to request certificates. That’d be the shiny new certificate template we created earlier. We tell NDES about it in the newly created MSCEP registry location.
Tip: this key being there also means that Mscep.dll is now installed and hopefully properly configured to listen for certificate requests.
Anyway, open the registry editor (regedit.exe) and go to:
HKLM\SOFTWARE\Microsoft\Cryptography\MSCEP.
In there you’ll see the keys for EncryptionTemplate, GeneralPurposeTemplate, and SignatureTemplate certificates. They should all say IPSECIntermediateOffline at this point. Modify those keys to instead use the name of the certificate you created earlier. IntuneNDES in my example:
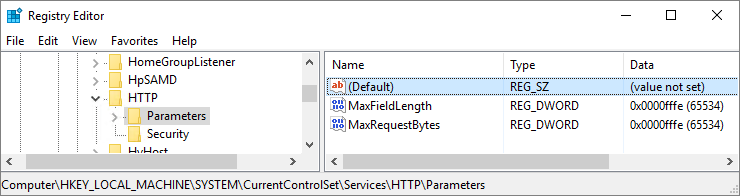
While you’re editing the registry, might as well let the NDES server know it’s OK to accept crazy long url certificate requests because that’s a thing it needs to do. Go to:
HKLM\SYSTEM\CurrentControlSet\Services\HTTP\Parameters.
There shouldn’t be much there besides an empty Default key. Let’s add a few things so it’s not lonely. Add these two DWORD value registry keys, both with a decimal value of 65534:
- MaxFieldLength
- MaxRequestBytes
Now we just need to add two more registry values to avoid possible Schannel errors from showing up in your Windows Event Viewer and we’re done. No, this recommendation isn’t in the docs, but do a quick web search on Schannel and NDES. I’ll wait.
Back? OK, now let’s make those changes at: HKLM\SYSTEM\CurrentControlSet\Control\SecurityProviders\SCHANNEL.
Add these two DWORD value registry keys along with their
values:
- SendTrustedIssuerList (with decimal value 0)
- ClientAuthTrustMode (with decimal value 2)

And that’s it for the registry so let’s close that editor now.
Still feels weird telling people to edit their registry after all these years.
NDES IIS configuration
Almost there.
Now we need to bind a certificate to IIS so the NDES Server won’t
be breaking any trust chains.
On the NDES server, open a new MMC and add the Certificates snap-in targeting the local computer. Right click Certificates from the computer’s personal certificate store and select All Tasks > Request New Certificate.
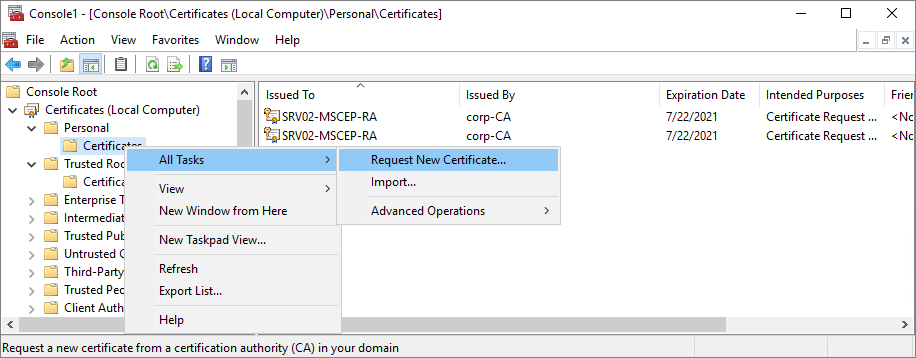
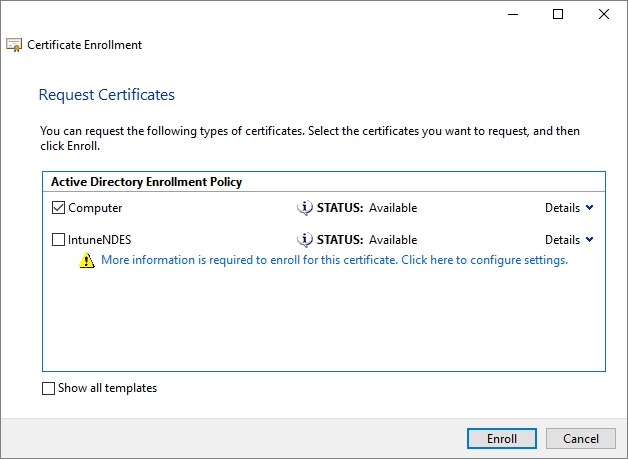
Proceed through the certificate enrollment wizard, accepting default values. On the Request Certificates page, select Computer (which is good for server authentication). Our custom template has some settings that make using it for this kind of a pain so we’re taking the computer certificate template route here.
Click Enroll and then Finish to close the wizard. You should see the new certificate in the personal certificate store. Let’s go put that certificate to work.
Open Internet Information Services (IIS) Manager (inetmgr.exe) on the NDES Server. Expand the server and then select Application Pools. You should now see an application pool named SCEP if all is going well.
Tip: that’s also where you can check later if you forget what service account you have running NDES.
Drill down to the Default Web Site node and select it. Time to add the SSL certificate.
- In the Actions pane on the right side, select Bindings…
- Click Add…
- Select https from the Type drop-down and the server certificate you just requested from the CA in the SSL certificate drop-down list. Click OK and then Close.
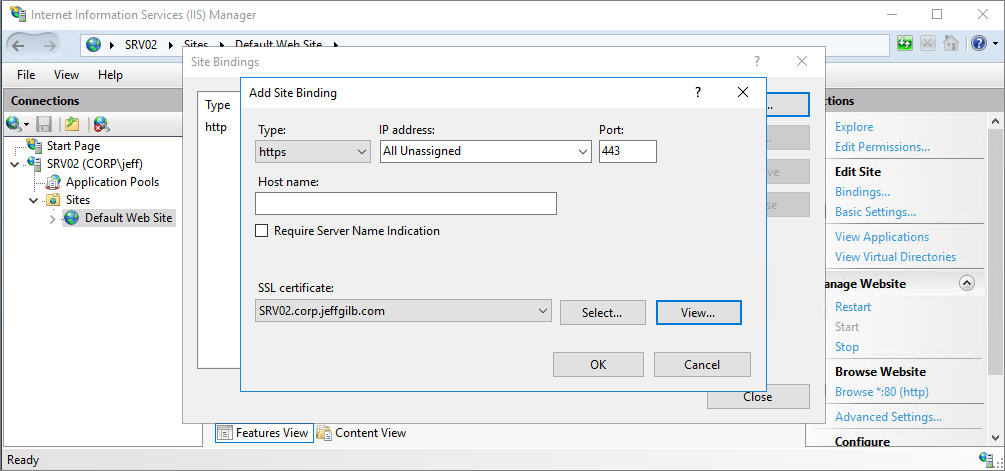
Close IIS manager and use a web browser to check that NDES is responding: https://<serverFQDN>/certsrv/mscep/mscep.dll
If you see something like this, it’s working and it’s also time to reboot the server:

Get connected to Intune
At this point NDES is working, but we need to tell Intune about it by installing the Intune certificate connector. You don’t have to search the internet looking for where to download the connector. It’s easy to find right in the Azure portal at Intune > Device Configuration > Certificate Connectors. You can either browse to the portal while logged on the NDES server and install it directly or download the installation bits to use elsewhere by following the instructions you get when you click +Add from that location. Either way, once you get NDESConnectorSetup.exe on your NDES server, run it.
- Accept the end-user agreement.
- Accept the defaults for installation folder.
- Ensure SCEP and PFX Profile Distribution
is selected. - Next, you can select the same certificate you bound
to IIS on the NDES server. That’s because it’s a computer certificate with
client auth EKU (just figured I’d throw that in there for all you security
types out there). - Review the cert details and pay attention to the
expiration date. - Click Install
to kick off Intune certificate connector installation.
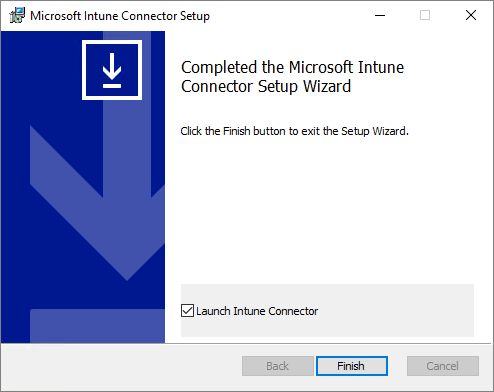
The Intune connector is a pretty basic installer, but the
good news is that it will tell you if you’ve forgotten to configure some of the
server roles or features and let you try again. We did our homework though so if,
I mean when, all goes to plan, you’ll soon see the completed page.
Select the Launch Intune Connector option and then click Finish. If you forget to check that box before you click Finish, you can open the UI from: C:\Program Files\MicrosoftIntune\NDESConnectorUI\NDESConnectorUI.exe.
With the connector open, it’s time to put that cloud-based NDES service account to use. Technically, you could use any old Intune Administrator account, but service accounts help keep things organized and they’ll never leave you for another company a year from now taking their passwords with them. Random issues can also arise from time to time from using the same account in too many places or for too many uses so let’s avoid that.
Click Sign in to add your cloud-based service account (created in prereqs) and you should be rewarded with a little Successfully enrolled pop-up window. Click OK to get rid of that and then select the Advanced tab. Where you’ll enter your on-premises NDES service account information and click Apply. The connector UI should look something like this now (I didn’t need to enter any proxy info):
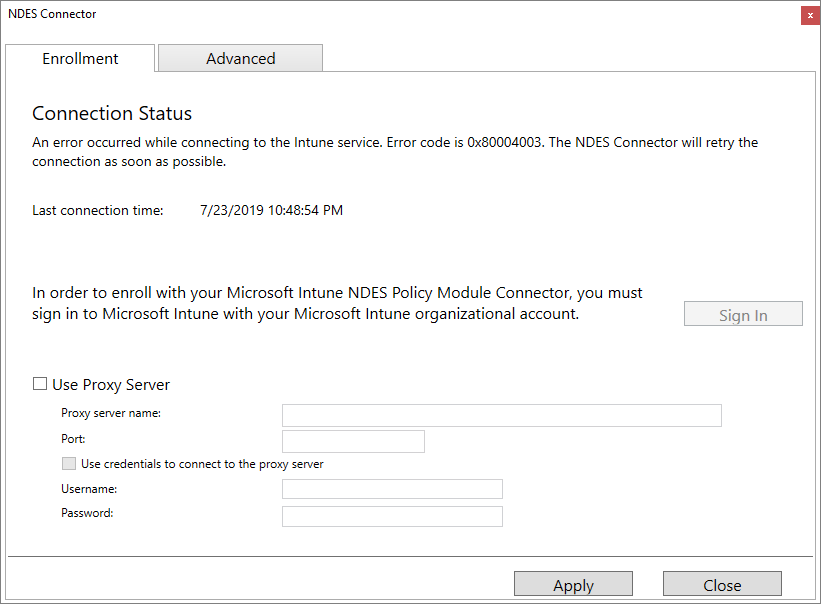
Click Close.
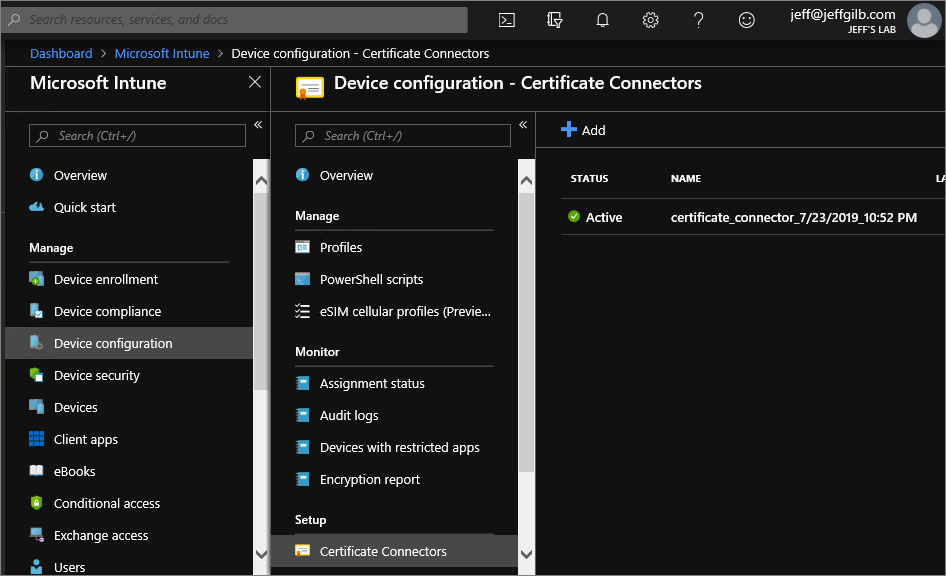
Next, take another look in the Intune portal, you should see
the new certificate connector is Active:
Make the NDES externally available
Before we go any further, let’s check that url again to be sure everything is working as it should be after the server reboots. Open a browser and go back to where we last saw the NDES page at https://<servername>/certsrv/mscep/mscep.dll.
Do you see something like this?
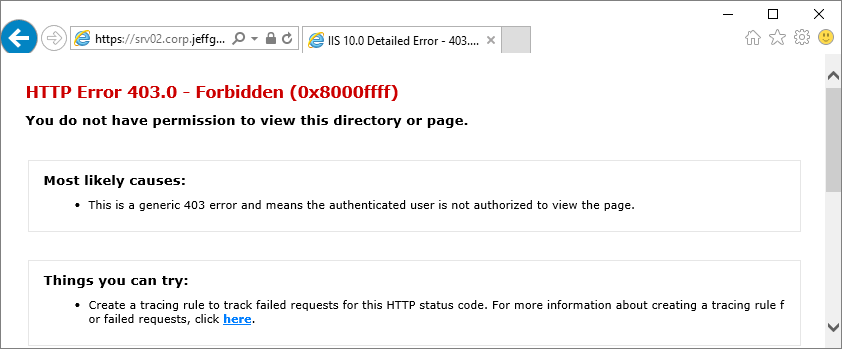
That looks bad. And that’s good. It means NDES now doesn’t like you poking around it’s urls with a browser instead of properly sending a certificate request to the Intune connector. Time to move on.
Next you need to open your NDES server up to all incoming connections over 443 from the internet and we’re done! Wait, wut? You don’t think that’s a good idea? OK, fine, let’s use the Azure Application Proxy you set up as part of the prerequisites.
Head back to the Azure portal, but this time go to where application
proxy lives. If you’re searching for the service and can’t find it, that’s
because it’s a feature of Azure Active Directory and not a standalone service. Go
the Azure Active Directory blade’s App Proxy section first.
Click +Configure
an app at the top to start adding your own on-premises application. Fill out the Basic Settings section according
to your settings and then set Pre
Authentication to Passthrough. Ignore the Additional Settings area for now and then click +Add to finish.
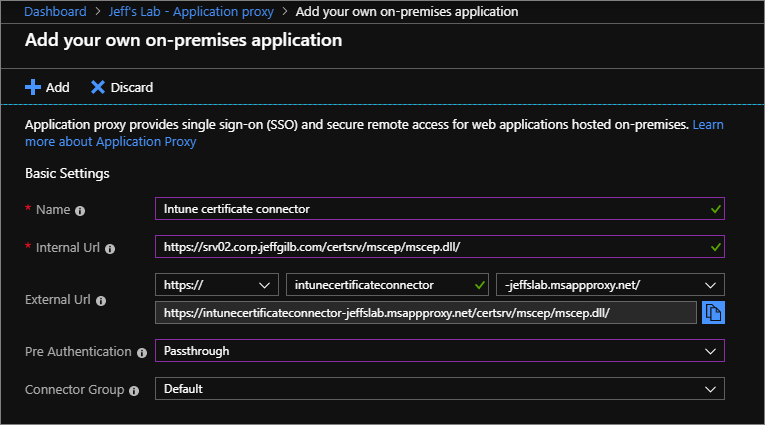
Technically, you can get fancy and use your custom domain name instead of the default msappproxy.net address, but honestly that’s just extra overhead for something no one is ever going to see and that url is already secured with Microsoft-provided SSL.
Now that you have an externally accessible Intune certificate connector url for the on-premises NDES server, you can use it with Intune.
If you’re up for more fun you can go do all of this over again to add more NDES/Intune connector servers for redundancy. Two is one, one is none, and three is better (same for App Proxy). For me and this blog post though, the NDES server making party is over.
So now unfortunately is the end of the road for this blog post as (believe it or not) I’m trying to keep it as short as possible. There’s a lot more that we can talk about with NDES and tracking the certificate request and delivery processes in more detail, but that’s out of scope for this post.
That said, here are some suggested (and well documented) next steps with Intune to keep you busy for a while:
- Create
and assign a trusted certificate profile. You’ll need that exported root CA cert for this and please don’t forget
to deploy this before you deploy the SCEP profile. - Create
a SCEP certificate profile - Assign
a SCEP certificate profile
I hope this post helps. I’ve turned off commenting on these blog posts so if you have feedback, good or bad, please let me know via Twitter @JeffGilb.
![]()