If you’ve deployed Windows Autopilot at scale, you’ve probably seen this happen:
A user signs into their brand-new device for the first time, Windows finishes provisioning, the desktop appears…and then the questions start:
- “Am I done?”
- “Is my software installed yet?”
- “How do I get Company Portal?”
- “Which device did I receive?”
- “Why is Outlook missing?”
- “Was this setup successful?”
Technically, everything worked. From the user’s perspective? Not so much.
Most organizations invest heavily in automated deployment but completely overlook the first experience. Users land on a desktop with no context, no guidance, and no indication that applications may still be installing in the background. And everyone knows a confused user is just a ServiceNow incident waiting to happen.
I wanted to solve that final mile of Autopilot provisioning and include the user in the experience to stick the landing. That’s what this blog is all about.
The Goal
The goal was a lightweight, fully automated welcome experience that launches immediately after a user’s first sign-in, provides useful information about their new device, and then quietly cleans itself up.
Here are the requirements I set for myself:
- Brand and personalize the experience for users
- Show important device information in case support needs it
- Explain what’s still happening in the background
- Give users useful next steps to get started with their new device
- Provide self-service support resources in case things go wonky
- Require zero administrative intervention or maintenance
- Run once and disappear cleanly
What the User Sees
Before we peek behind the curtains to see how I did it, here’s the 10,000-foot overview.
Shortly after a user’s first sign-in, Microsoft Edge launches in application mode and displays a personalized welcome page. So instead of just staring at their desktop wondering what to do next, users immediately see:
- Their name in a personalized and company branded welcome message
- High-level information about their device configuration (yes, apps are still on the way)
- Recommended next steps
- Action buttons for common tasks (add Bluetooth devices, open company portal, etc.)
- Device information they might need if they have to call support
- Resources and helpful links
- Support information
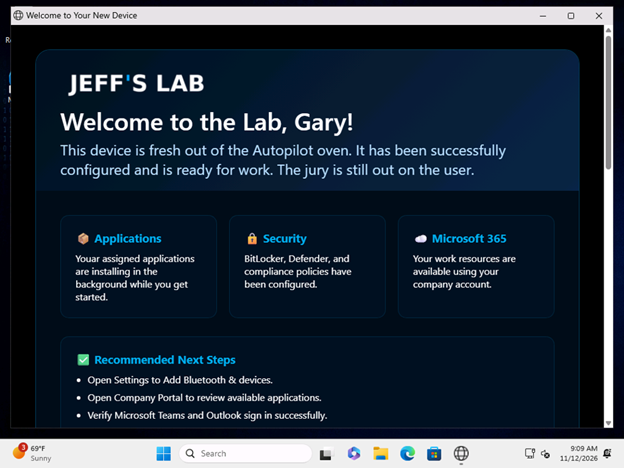
Those are just suggestions and what I did for my lab. You can customize the welcome page with whatever suits your (or Copilot’s) fancy. Most important to me though is that they receive reassurance that provisioning completed successfully and that assigned applications may still be installing behind the scenes. No, you don’t need to see all 1,000 of your favorite apps at first log on Gary.
If you’ve been to any of my MMS sessions, you’ve probably already met Gary. If not, he’s my screaming goat lab tester who specializes in breaking things, finding edge cases, and generally being the user who ignores every instruction.
How It Works
The solution consists of three major components:
- Welcome Page HTML
- PowerShell Launcher
- Scheduled Task
The entire process is staged during Autopilot provisioning and runs immediately after the user’s first login.
Step 1: Stage the Welcome Page During Provisioning
How you get the bits on your devices is up to you. I have my own version of Michael Niehaus’ Autopilot Branding app where the welcome page magic is just a function that I import from a co-located PowerShell module. But you could just take the function and package it as a Win32 app all on its own and deploy it during provisioning as a blocking ESP app (or assigned app if Autopilot v2 is your thing). Just make sure it’s a blocking app in ESP or listed in your Autopilot device preparation policy.
If you’re curious about how I use the Autopilot branding technique find me on LinkedIn, connect, and then harass me to write a blog about it until I finally get it done. I’ve been thinking I need to do that for about two years anyway.
However you deploy it, the needful files are copied into:
- C:\ProgramData\Autopilot\Welcome
We just need two files to be present there to make the magic happen:
- welcome.html
- LaunchWelcome.ps1
Step 2: Create a Scheduled Task
Next, the installation process also creates a scheduled task that will execute after the first user logon to launch LaunchWelcome.ps1 as the logged on user.
One challenge that always comes up with Autopilot is the infamous: defaultuser0 account used during provisioning. You don’t want your welcome page launching during provisioning, so the launcher script validates the logged-on identity and exits if provisioning is still underway. Only real users get the welcome experience.
The scheduled task is configured like so:
- Runs at user logon
- Delayed 10 seconds to let Windows wake up
- Hidden PowerShell execution
- Standard user context
- Battery-friendly settings
This ensures the experience feels native instead of intrusive.
Step 3: Personalize the Experience
This is where things get interesting. When the launcher executes, it gathers device information:
- Computer Name
- Serial Number
- Windows Version
- User Name
- Current Date/Time
The script then replaces placeholders within the HTML file before displaying it. Here are a few examples that ship as placeholders in my welcome.html page:
Hello, %USERNAME%becomes Hello, Jeff%COMPUTERNAME%might become something like WIN11-569574460- Etc.
This makes the page feel less like a corporate portal and more like a personalized onboarding experience. You can customize the welcome.html and provisioning script to replace whatever placeholders you want so you’re not stuck with just the examples I use. Just look for the lines like below and ensure the placeholder has been added to the html with whatever variable values you decide to use:
# Example placeholder replacements
$content = Get-Content $WelcomeFile -Raw
$content = $content.Replace("%USERNAME%", $UserName)
$content = $content.Replace("%COMPUTERNAME%", $ComputerName)
Set-Content $WelcomeFile $content
Step 4: Launch Edge in App Mode
One of my favorite tricks in all of this is using Edge Application Mode.
Instead of opening a normal browser window full of tabs and navigation controls, Edge launches as a dedicated application window. The result feels much more like a polished product than a local HTML file with an address bar that looks well…not so fancy.
The Welcome Page Sections
The page itself is intentionally simple and all of this is customizable in the welcome.html to suit your needs.
- Greeting. A personalized welcome that addresses the user by name and has a (base64 encoded) company logo to ensure the user trusts the experience.
- Status Cards. Highlights what’s complete and what’s still running in the background.
- Recommended Next Steps. Guides users toward common post-deployment activities.
- Quick Action Buttons. One-click access to commonly used resources. For things like:
- Adding Bluetooth devices
- Opening the Company Portal
- Making sure Teams/Outlook works
- Getting self-service help
- Etc.
- Device Information. Provides details users and support teams frequently ask for.
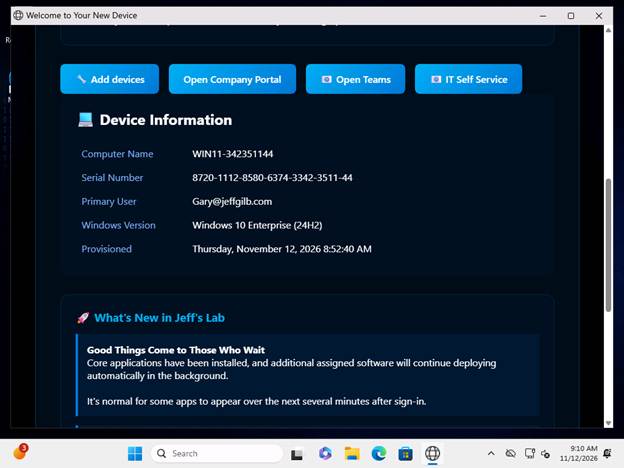
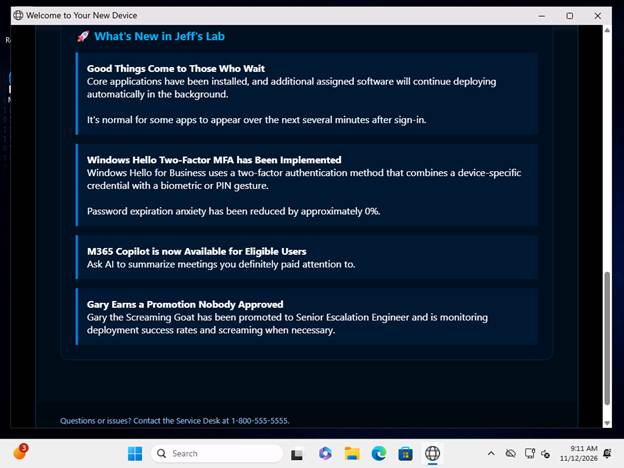
- What’s New. An area for information users might be interested in. Because every onboarding page should have at least a little personality.
- Support Section. If something isn’t working, users know exactly where to go for help by reading the fine print at the bottom.
The Cleanup Nobody Notices
Good automation should clean up after itself (IMHO). So, five seconds after the welcome page launches successfully, the launcher script deletes the scheduled task and the then deletes itself. This ensures that the welcome experience doesn’t appear again at every log on. Because that would be weird…like way back when the ESP used to run all the time with a mind of it’s own.
The result is a true one-time onboarding experience with virtually no long-term maintenance requirements.
Show Me the Bits Jeff
OK, here’s what you’ve been waiting for: here’s where you can grab all the files you’re looking for. As usual, I’ve stashed all the goodies in another one of my poorly organized GitHub repositories: https://github.com/jeffgilb/Autopilot-Welcome.
There, you’ll find the scripts I use to install and uninstall the welcome page and the example welcome.html to play with. The example scripts are very bare bones with minimal logging, but I figured you’d like it that way. Modify the install script and the welcome.html to do your bidding.
You can just add the install script function to your autopilot branding setup script or module and call it from there or package it on its own as an Intune Win32 app. Speaking of, I’ve made testing this even easier by providing a sample Install-WelcomePage.intunewin file and app properties cheat sheet to you get you started. Don’t say I never did anything for you.
Why All This Matters
This solution doesn’t solve a technical problem. It solves a human problem. Autopilot provisioning gets you 99% of the way there, don’t skimp on the last 1% of user experience.
Autopilot provisions devices, the welcome experience helps users understand what just happened after deployment. That small difference can change the perception of the entire onboarding process: users receive confirmation that everything worked, they understand which tasks remain, and they know where to find help.
A simple HTML page, a PowerShell script, and a scheduled task can turn a confusing handoff into a guided onboarding experience that feels intentional, polished, and professional. And best of all, your Service Desk isn’t flooded with tickets asking whether Application X is supposed to be missing five minutes after the first login.
Welcome to Jeff’s Lab. 😎
You’ve seen my blog; why not connect with me on LinkedIn too?
